
Page 280 - Agriculture_Form_Three
P. 280
Agriculture for Secondary Schools
Step 2: Marking
(i) Get four pegs and mark out the four corners of the area to be excavated. Mark
out a big square of about 26 m × 26 m. Mark the corners with pegs and run a
string between the pegs to show where the outside of the banks will be.
(ii) Excavate about 20 cm of topsoil from all over the square. Put the topsoil
aside. This soil will be put back on the top and outer sides of the banks after
construction.
(iii) Mark out a smaller square of about 20 m × 20 m inside the big square.
(iv) The bottom of the bank in the shallow part of the pond and along the sides
would be about 1 metre from the upper end and sides of the small square.
(v) The bottom of the bank in the deepest part of the pond would be about 2 metres
from the lower end of the small square.
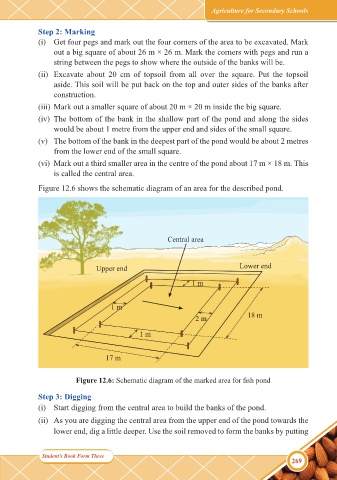
(vi) Mark out a third smaller area in the centre of the pond about 17 m × 18 m. This
is called the central area.
Figure 12.6 shows the schematic diagram of an area for the described pond.
Central area
Upper end Lower end
1 m
1 m
2 m 18 m
1 m
17 m
Figure 12.6: Schematic diagram of the marked area for fish pond
Step 3: Digging
(i) Start digging from the central area to build the banks of the pond.
(ii) As you are digging the central area from the upper end of the pond towards the
lower end, dig a little deeper. Use the soil removed to form the banks by putting
Student’
Student’s Book Form Twos Book Form Three
269
10/01/2025 12:32
AGRICULTURE FORM 3 9.11.2022.indd 269
AGRICULTURE FORM 3 9.11.2022.indd 269 10/01/2025 12:32