


Page 172 - Agriculture_Form_3
P. 172
Agriculture for Secondary Schools


              and safeguard the health of a cow. It also reduces the risk of diseases like mastitis
              and improves the quality of milk. Milking can be done by hand or using a milking
              machine. The choice depends on the number of cows and the capital (money)
              available. In either case, milking must follow proper procedures before, during
              and after the process.
          FOR ONLINE READING ONLY
              Preparation before milking
              Before milking, it is important to prepare both the animal and the milking utensils
              properly. Start by gathering all necessary materials, requirements or tools. In the
              case of hand milking, prepare the following: a stool, a clean bucket, a towel,
              warm water, a milking salve, a strip cup, and dairy feed. Make sure all equipment
              is clean, dry, and in good condition to avoid contaminating the milk or causing
              injury to the animal. Proper preparation of these items helps to ensure that milking
              can be done smoothly and hygienically.

              Wash the udder thoroughly by using warm water to remove any dirt. Then, dry
              the udder with a clean towel to prevent infection. Use a strip cup to examine
              the first milk for signs of mastitis, such as clots, blood, or a bad smell. If any
              of these signs are seen, the cow should not be milked with the others, and a
              livestock extension worker should be consulted for proper treatment. Finally,
              apply a milking salve to the teats to reduce friction and prevent scratching during
              milking.
              Hand milking procedure
              Hand milking is common on smallholder farms. It must be done gently, quickly,
              and using clean tools. Hand milking should take no longer than 7 minutes per
              cow to match the natural milk let-down period and avoid loss of yield. After the
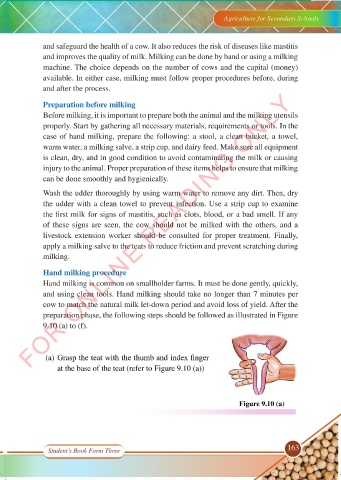
              preparation phase, the following steps should be followed as illustrated in Figure
              9.10 (a) to (f).


               (a) Grasp the teat with the thumb and index finger
                  at the base of the teat (refer to Figure 9.10 (a))


                                                                         Figure 9.10 (a)


                Student’s Book Form Three                                               163


                                                                                            17/09/2025   14:12
     AGRICULTURE F3.indd   163
     AGRICULTURE F3.indd   163                                                              17/09/2025   14:12

